A noob sets up Proxmox 8.0
July 17, 2023
2023-12-28: UPDATE the second: much battling with TrueNAS ensued and I simply don’t have enough understanding to troubleshoot all the layers involved in TrueNAS. After not being able to get anything that I wanted to work (Nextcloud, Vaultwarden) I gave up and ignored the whole thing for a while. I realized that I need to start very simply (since my home lab setup is entirely for learning purposes). I now have Proxmox running again (since that DID work) and I’ve stood up a Debian VM (LXC is a bad idea as it doesn’t play nicely with Dockers overlayfs) on it. This is a lightweight virtual Debian system (which both Proxmox and TrueNAS Scale are based on). It’s running Docker and I’m now running a reverse proxy (which is also getting me my SSL certs from Letsencrypt yay!) and one service. Which I’m happy to say IS working. Next steps are to secure the setup more than it already is (remove root wherever it’s easy and makes sense to do for example) and get backups working. Then start adding more services, possibly a additional VMs or LXCs using the reverse proxy that’s already been setup.
2023-09-18: UPDATE: after setting up an environment with proxmox on the bare metal and TrueNAS virtualized, I had a disk failure and discovered why you might want TrueNAS on the bare metal. The failed disk was being mirrored by both proxmox AND TrueNAS (remember how it says NOOB up there at the top of this posting). TrueNAS doesn’t get the SMART feedback from the disk that proxmox does and the disks were passed through proxmox to TrueNAS, which means TrueNAS happily mirrored the errors… sigh. I have now abandoned this setup as proxmox doesn’t appear to provide enough benefit for my homelab with only one hardware server. TrueNAS Scale build on Debian and with the improvements they’ve made to virtualization should be sufficient. We’ll see.
Proxmox Virtualization Environment is an open source virtualization environment intended to run on linux. There is an enterprise edition (a little less than the cost of a lower-end cell phone subscription for a year for “Standard”) and a community edition (for personal use only, without access to the “enterprise” repositories).
The choice to use Proxmox was, in the end due to word of mouth. Reading reviews supported the decision so I went with it.
I found several setup guides but they seem to miss some of the basics for someone like me (not a full-time linux user, not a full time admin). I do appreciate the instructions for setting up the installer on a USB stick but missing basics like network and user configuration (so you aren’t logging in as root all the time) means I’m spending a bunch more time learning to be a linux system admin, which currently I’m not.
Your mileage may vary but these are my notes, if you find them useful, I’m glad, if you don’t like what I’ve done, feel free to politely comment or ignore me.
Prerequisites and during install
I got a hold of a gently used Lenovo business desktop and made sure it has the ram and disk I want. A couple of things to note here.
- Go into the BIOS of the system and ensure that Virtualization is enabled (providing your hardware supports it). Generally for systems that didn’t start life as a server, this is NOT enabled. In particular you’re looking for Vt-d and TXT (no that’s not SMS but Trusted Execution Technology). If these aren’t enabled and you run the installer it will complain that virtualization is not enabled, this isn’t critical but if your hardware supports it why not enable it.
- The system will ask you what filesystem you want (since it formats the drive it’s installing to), recommended by most is ext4 for the OS and Proxmox itself (ZFS for the data, where the guest systems information will live).
- Ensure you know what IP(s) you want the system to run on (on your local network), this information will be entered during the install. It appears in /etc/network/interfaces AND in the proxmox configuration, if they don’t match what Proxmox thinks (and is configured for vmbr0 in /etc/network/interfaces) then the Debian system will not have access to any network.
- It will ask for a fully qualified domain name at install, this doesn’t matter until much later. At this point you can put in anything (so long as it looks like an FQDN) and configure your own DNS later.
Once Installed
Networking Issues
When I found I had no network (on the first bootup) I got into /etc/network/interfaces and mucked about until I got connected to my internal network and could see the PVE interface from another system’s browser. The following is the contents of /etc/network/interfaces while I was mucking about, note this is INCORRECT but will let you get to the pve webGUI. Note also that vmbr0 here has a different bridge interface (or you get errors because the system doesn’t like trying to both manually and automatically, using DHCP, set an IP for the same interface) and you end up with an IP address for eth0 that works on the internal network but doesn’t get the system to connect outside to the internet.
auto lo
iface lo inet loopback
iface eth0 inet dhcp
auto vmbr0
iface vmbr0 inet static
address 192.168.100.2/24
gateway 192.168.100.1
bridge-ports eth1
bridge-stp off
bridge-fd 0
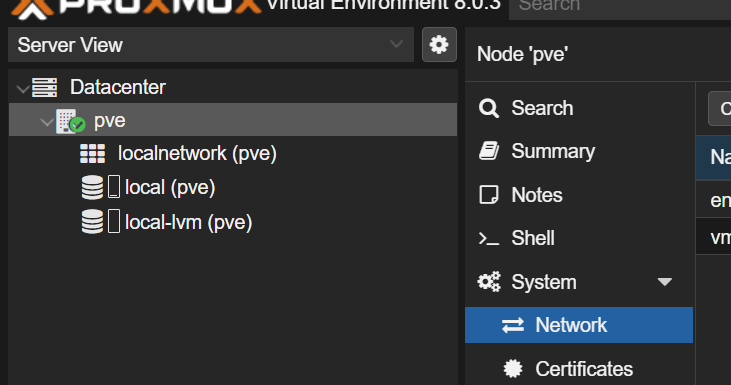
Once vmbr0 and what proxmox was configured for matched (webGUI to get to network config is pictured below, my server was imaginatively called pve), the system could see the world and check for software updates and installs could be done.
My final (and as far as I know correct) /etc/network/interfaces looks more like the following.
auto lo
iface lo inet loopback
auto eth0
iface eth0 inet manual
auto vmbr0
iface vmbr0 inet static
address 192.168.100.2/24
gateway 192.168.100.1
bridge-ports eth0
bridge-stp off
bridge-fd 0
Note the auto (for eth0) for the network interface itself. This is required or the network doesn’t turn on automatically when the system reboots. Without it you’re stuck doing ifup eth0 after bootup to get that interface to run. Also note that the bridge-ports is now the correct interface and the IP set here is the IP the system gets when it’s running. This is also the same IP I statically reserved in DHCP on my own router for this MAC address to ensure no conflicts would occur.
Enterprise vs Community Repositories
Proxmox in an effort to make money (and really who can blame them) have set the system by default to point to Proxmox enterprise repositories. Without a subscription you’re NOT entitled to download from there (go figure). So, instead you have to reconfigure the repositories the system points to.
To manage the repositories I used the suggestions linked to here.
Root
The system starts up with only one user, root. There are many articles online about why this is bad… I agree with all of them. To fix this you need to add a user(s) to Debian, then add them to proxmox, then create a group with admin permissions in proxmox and put the new user(s) in to this group. While you’re at it, install sudo on Debian and add your new user to the sudoers group so you don’t ever have to use root directly again. Once you’ve tested that you can SSH to proxmox AND can log into the webGUI for proxmox with your new user THEN you can disable login for root (that is providing your done with this user, if you intend to use the built-in ACME certificate management, keep root around until you have that configured).
This looks like the following, in SSH console
Install sudo (enabling non-root users to do root things)
apt-get install sudo
add your admin user to be used instead of root
adduser bob
make your admin user a sudo-er so they can do all the things root is needed for
usermod -aG sudo bob
Now test this user for SSH access (using an SSH client try logging into the proxmox system). Once you have that working move on to adding this user as an administrator of proxmox.
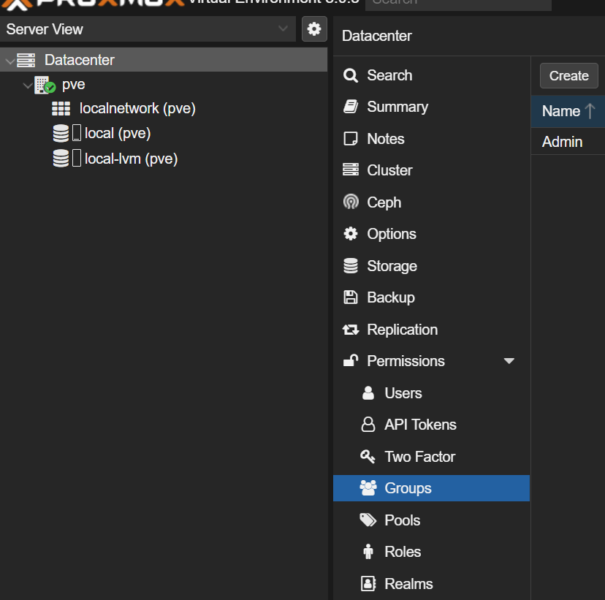
In the webGUI, go to Datacenter -> Groups and create a new group.
To assign roles to the group I haven’t found a webGUI way to do it, so I resorted to the following in the Shell (or you can do it through the SSH interface)
pveum acl modify / -group admin -role Administrator
That is providing the Group name you created was “admin”, the Administrator role is configured and available out of the box.
Next add your User(s) (see above image, there’s a Users, option there) and add them to the admin group. Ensure you use the correct username(s) as proxmox webGUI doesn’t appear to be looking users up in Debian.
Now test again by logging out of the webGUI and login as your new user (bob in the above example).
Now, disable root. There are MANY options for doing this. In the end I settled on locking and expiring the account as recommended in the man pages for passwd.
sudo passwd -l root
sudo usermod -e 1 root
As an FYI to unravel this you’ll need the following, the first unlocks the root by setting a password
sudo passwd root
Removing the expiry date on the root account can be achieved with chage
sudo chage -I -1 -m 0 -M 99999 -E -1 root
Storage (Disk Space, that is to say)
I set the system up entirely on an SSD to start with. The plan is to add a 3TB disk and have that hold the majority of the files. The way proxmox is setup it’s easy to have operating systems installed to the SSD and all file space for any VMs on the hard drives. Backups will land on an external (USB connected) hard drive that will be swapped out and moved off site every 2 weeks. I’m choosing to have all disk managed by TrueNAS which means I don’t have to work too hard (I believe) to setup real-time mirroring of the disks right away. It also allows me to add disk dynamically to the system without having to really work too hard or worry about moving from mirror to more complicated forms of software RAID.
Adding disk to TrueNAS specifically means passing physical disks through proxmox to TrueNAS. This happens on the command line in Proxmox.
There’s a neat trick for passing through everything attached to a PCI board where you actually pass the board through to the underlying VM. I don’t have that so I won’t talk about it here. In an earlier incarnation of this server I thought I’d pass through individual disks to VMs. The idea is you need the ID of the disk, which you then add to the command to pass the disk through.
ls -l /dev/disk/by-id/
This will provide you with a long list of all disks and partitions. In my case it looks like this
lrwxrwxrwx 1 root root  9 Jul 28 04:44 ata-Samsung_SSD_840_EVO_120GB_S1D5NSAF714035W -> ../../sda
lrwxrwxrwx 1 root root 10 Jul 28 04:44 ata-Samsung_SSD_840_EVO_120GB_S1D5NSAF714035W-part1 -> ../../sda1
lrwxrwxrwx 1 root root 10 Jul 28 04:44 ata-Samsung_SSD_840_EVO_120GB_S1D5NSAF714035W-part2 -> ../../sda2
lrwxrwxrwx 1 root root 10 Aug  7 17:09 ata-Samsung_SSD_840_EVO_120GB_S1D5NSAF714035W-part3 -> ../../sda3
lrwxrwxrwx 1 root root  9 Aug  7 17:27 ata-ST3500410AS_5VM0NKRS -> ../../sdc
lrwxrwxrwx 1 root root 10 Aug  7 17:27 ata-ST3500410AS_5VM0NKRS-part1 -> ../../sdc1
lrwxrwxrwx 1 root root 10 Aug  7 17:27 ata-ST3500410AS_5VM0NKRS-part2 -> ../../sdc2
lrwxrwxrwx 1 root root  9 Aug  7 17:27 ata-ST3500410AS_5VM0RF2R -> ../../sdb
lrwxrwxrwx 1 root root 10 Aug  7 17:27 ata-ST3500410AS_5VM0RF2R-part1 -> ../../sdb1
lrwxrwxrwx 1 root root 10 Aug  7 17:27 ata-ST3500410AS_5VM0RF2R-part2 -> ../../sdb2
lrwxrwxrwx 1 root root 10 Jul 28 04:44 dm-name-pve-root -> ../../dm-1
lrwxrwxrwx 1 root root 10 Jul 28 04:44 dm-name-pve-swap -> ../../dm-0
lrwxrwxrwx 1 root root 10 Aug  7 17:09 dm-name-pve-vm--100--disk--0 -> ../../dm-6
lrwxrwxrwx 1 root root 10 Aug  7 17:09 dm-uuid-LVM-FgvkwWnOlEDfHCyy3D4dLMsZ9ga3Kdmo5rO4vcYvMq0CwqzWOWGfTak43foCQ8ol -> ../../dm-6
lrwxrwxrwx 1 root root 10 Jul 28 04:44 dm-uuid-LVM-FgvkwWnOlEDfHCyy3D4dLMsZ9ga3KdmoCyDES05GrGudlXoTsrkGiU2fAHH7YJ4k -> ../../dm-0
lrwxrwxrwx 1 root root 10 Jul 28 04:44 dm-uuid-LVM-FgvkwWnOlEDfHCyy3D4dLMsZ9ga3KdmoWvlFW51Cme60c8DCv2WUGkecBfGlaXSS -> ../../dm-1
lrwxrwxrwx 1 root root 10 Aug  7 17:09 lvm-pv-uuid-xy77l2-SxVH-9YZj-nrPf-rJu7-Spgu-HcQy9M -> ../../sda3
lrwxrwxrwx 1 root root  9 Aug  7 17:27 wwn-0x5000c50013b66e91 -> ../../sdc
lrwxrwxrwx 1 root root 10 Aug  7 17:27 wwn-0x5000c50013b66e91-part1 -> ../../sdc1
lrwxrwxrwx 1 root root 10 Aug  7 17:27 wwn-0x5000c50013b66e91-part2 -> ../../sdc2
lrwxrwxrwx 1 root root  9 Aug  7 17:27 wwn-0x5000c50013c2aceb -> ../../sdb
lrwxrwxrwx 1 root root 10 Aug  7 17:27 wwn-0x5000c50013c2aceb-part1 -> ../../sdb1
lrwxrwxrwx 1 root root 10 Aug  7 17:27 wwn-0x5000c50013c2aceb-part2 -> ../../sdb2
lrwxrwxrwx 1 root root  9 Jul 28 04:44 wwn-0x50025388a05bf868 -> ../../sda
lrwxrwxrwx 1 root root 10 Jul 28 04:44 wwn-0x50025388a05bf868-part1 -> ../../sda1
lrwxrwxrwx 1 root root 10 Jul 28 04:44 wwn-0x50025388a05bf868-part2 -> ../../sda2
lrwxrwxrwx 1 root root 10 Aug  7 17:09 wwn-0x50025388a05bf868-part3 -> ../../sda3
the lines you really care about are the ones that correspond to the drives themselves (sda, sdb, sdc). To pass a disk through you use the id in the following way.
qm set 100 -scsi1 /dev/disk/by-id/ata-ST3500410AS_5VM0NKRS
I this case you’re setting a disk with scsi id scsi1 (0 is already taken, that’s where you installed the OS when you first installed TrueNAS) and you’re assigning the disk with id ata-ST3500410AS_5VM0NKRS to it. This is for VM id 100.
qm set <VM-ID> -scsi<n> /dev/disk/by-id/<disk-id obtained from ls command above>
However in my case I ultimately chose not to do this. Instead I added the disk to the lvm space already available. I’m not happy with this as it merges the SSD space that was left after the install of proxmox (which I enabled in proxmox with the 3TB drive that I’ve added. Proxmox allows you to do this and since I was in a hurry when I set this up this time I went with this solution but I think I will separate the harddrive space from the SSD space when I re-make this machine next (which I’m sure will come soon as I learn more).
What I should have done I believe is add the disk as Directory storage without fussing about. Add a clean disk (or clean it yourself using commandline
fsdisk /dev/sd<letter of drive as seen in the proxmox node Disks> eg fsdisk /dev/sdc
use g to re-initialize the disk for GPT and w to write the change to the disk).
Then using the webGUI you can go to your node Disks > Directory and “Create Directory”. Choose the right disk (in the example above that would be /dev/sdc) and select a file system (ext4 is a good choice if adding a single disk like this) and finally give it a sensible name (DIR01 for example). Ensure Add Storage is selected (this adds the storage to the data centre). This makes this a storage option under the node and will be able to hold any kind of data proxmox may have to store. This doesn’t offer some of the advanced file backup options that proxmox can handle natively (snapshots for example) but at this point, I don’t believe I’ll get into too much trouble providing I correctly back up the system. This will likely change as I learn more. The challenge here is the conflicting advice on how to do storage for proxmox. A popular/sensible? setup appears to be a pair of internal matching disks setup as ZFS with a mirror configuration to take advantage of the native capabilities of zfs and proxmox. The hardware I’m working with right now doesn’t have enough internal room to handle 2 full sized hard drives, so I’m still considering what I might do about this.
I added an external drive for backup a bit differently (primarily out of ignorance). Plug the USB disk into the proxmox server hardware. It will pick up the hardware and give it a /dev/sd<next letter> eg /dev/sdd (relative to the above example), you can see this in the webGUI under the Disks on the Node. I then added a mount point (a directory under /mnt)
mkdir /mnt/drivename
then ensured the disk was formatted for use (mkfs.ext4 /dev/sdc for example). Adding it to /etc/fstab ensures the system will mount the drives again after a reboot.
nano /etc/fstab
add the following line to the fstab
UUID=<uuid of the disk> /mnt/drivename ext4 defaults,noatime,nofail 0 2
obtain the uuid of the disk with the following (it will be the long guid in front of the listing that ends in your drive (sdd in this example):
ls -l /dev/disk/by-uuid/*
You use
mount -a
to get the system to connect to your new drive. After that in the webGUI you add a Directory to the Datacenter > Storage > add > Directory with name and mount path (eg /mnt/drivename) and Content: “VZDump backup file” (at least for now and for ease of use, I’m using proxmox’s built in backup for the whole VM, I’ll get into rsync and/or borg as well as pg_dump when I’m feeling more confident to backup file systems and databases as well). This gives us the same “unadorned” storage as above but it’s the backup… I don’t need to backup the backup by taking snapshots.
I’m currently running a single VM, OS Debian 12 with Docker and docker-compose installed. This is being backed up as a VM to the external drive. The long term plan is to run daily backups to this disk for 2 wks then swap it for another the same size, taking it off site, which should provide me with up to 4 wks of backups.